Introduction to No-Bake Chocolate Cherry Lush
What is a “lush” dessert?
A “lush” dessert is a layered, no-bake treat that’s as indulgent as it sounds. Typically made with a buttery crust, creamy layers of pudding or cheesecake filling, and various toppings, lush desserts are beloved for their rich flavors and dreamy textures. They’re easy to assemble, require no oven time, and are perfect for serving at gatherings or enjoying as a refreshing summer treat.
Why this combination is so irresistible
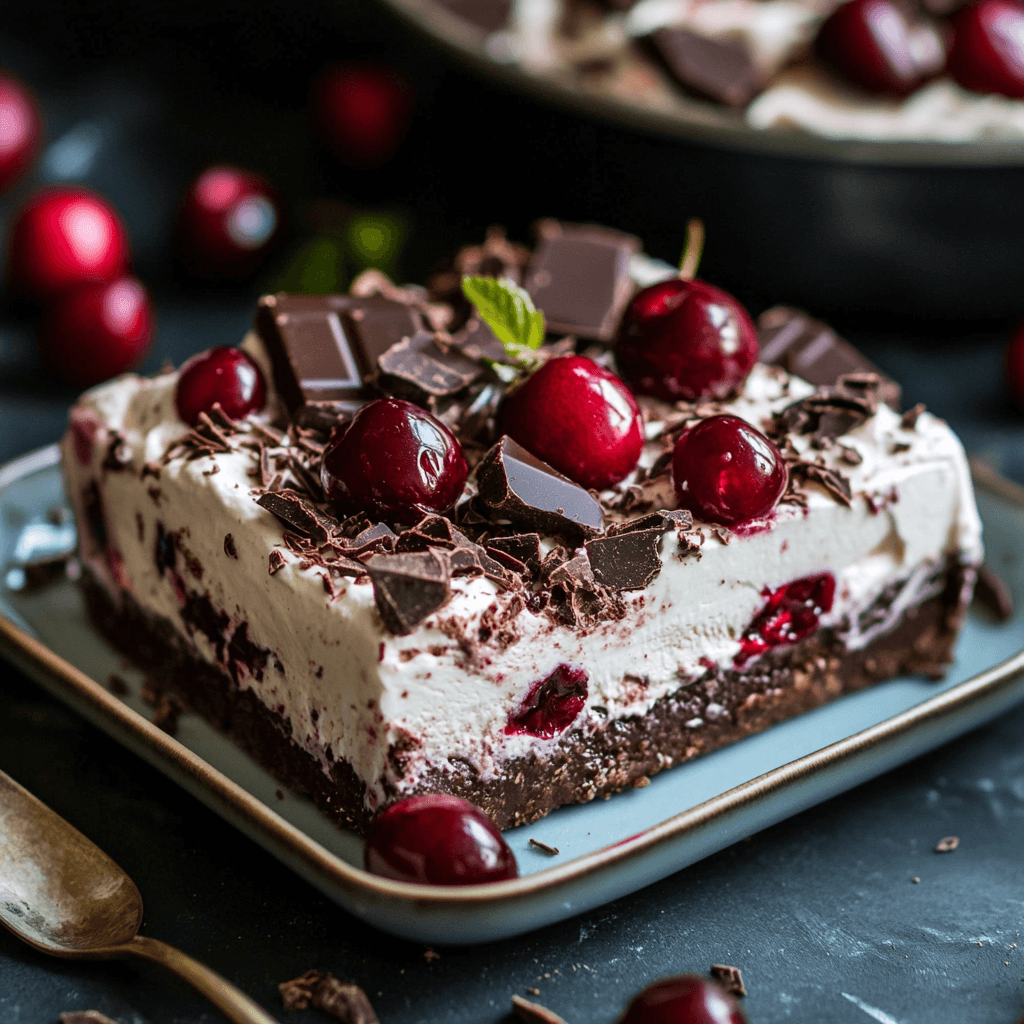
The No-Bake Chocolate Cherry Lush takes this classic dessert concept to a whole new level. The sweet-tart burst of cherries paired with smooth, velvety chocolate creates a flavor match made in heaven. The combination offers a perfect balance: the cherries provide a bright, fruity contrast to the deep, decadent chocolate. Add to that the creamy layers and a crunchy base, and you get a dessert that’s not only beautiful but also absolutely irresistible. It’s a dessert that delights with every bite, making it a guaranteed crowd-pleaser.
Benefits of No-Bake Desserts
Easy and quick preparation
One of the greatest advantages of no-bake desserts is how simple they are to make. Unlike traditional baked treats, these desserts don’t require precise timing or constant monitoring in the oven. Most no-bake recipes come together in just a few steps — mix, layer, and chill — making them ideal for both novice bakers and anyone short on time.
No oven needed
No oven? No problem! No-bake desserts are perfect for those who don’t have access to an oven or prefer to keep the kitchen cool. You can create impressive, delicious desserts without heating up your entire house, which is especially appealing during hot summer months.
Perfect for warm weather and gatherings
When the weather is warm, the last thing you want to do is turn on the oven. No-bake desserts provide a refreshing alternative, often served chilled and enjoyed cold. They’re also great for gatherings and potlucks — easy to transport, easy to serve, and always a hit with guests.
Essential Ingredients for Chocolate Cherry Lush
Crust options
The foundation of any lush dessert is its crust. For a Chocolate Cherry Lush, you can choose from a variety of options to suit your taste:
- Oreo cookie crust: Adds an extra layer of chocolatey goodness.
- Graham cracker crust: A slightly lighter, buttery base that pairs well with the rich layers.
- Chocolate wafer crust: Offers a deep chocolate flavor and crisp texture.
Cherry layer ingredients
The cherry layer is what makes this lush dessert truly stand out. You’ll need:
- Cherry pie filling (store-bought or homemade)
- Fresh or frozen cherries (optional, for extra texture and burst of flavor)
Chocolate pudding layer
This rich, creamy layer is the heart of the dessert’s indulgence. You’ll need:
- Instant chocolate pudding mix
- Cold milk (usually whole or 2% for extra creaminess)
This layer adds a smooth, velvety texture and deep chocolate flavor.
Creamy toppings
The final touch brings it all together. For the topping, you’ll need:
- Whipped topping (such as Cool Whip) or homemade whipped cream
- Cream cheese (to add richness and stability to the top layer)
- Powdered sugar and vanilla extract (to lightly sweeten and flavor the creamy mixture)
Choosing the Best Cherries
Fresh vs canned or frozen cherries
When it comes to making a Chocolate Cherry Lush, the type of cherries you choose can make a big difference in flavor and texture.
- Fresh cherries bring a bright, natural sweetness and a pleasant bite. They’re a fantastic choice when in season, but they do require pitting and sometimes cooking down to soften.
- Frozen cherries are a convenient alternative to fresh. They’re picked and frozen at peak ripeness, so they retain good flavor. Just be sure to thaw and drain them well to avoid excess moisture in your dessert.
- Canned cherries offer the most convenience and consistent sweetness but may be softer and have a slightly different texture.
Cherry pie filling vs homemade
Using cherry pie filling is the easiest route, as it’s already sweetened, thickened, and ready to use straight from the can. It also adds a glossy, attractive layer to your dessert.
If you prefer a fresher, less sweet taste, you can make your own cherry filling at home by cooking fresh or frozen cherries with sugar, cornstarch (for thickening), and a splash of lemon juice. Homemade filling allows you to control the sweetness and achieve a more natural cherry flavor.
Tools and Equipment You’ll Need
Mixing bowls
You’ll need a few mixing bowls of different sizes for preparing the crust, pudding, and cream layers. Having extra bowls on hand makes it easier to keep your layers smooth and distinct.
Hand mixer or whisk
A hand mixer is especially helpful for whipping cream cheese and whipped topping until smooth and fluffy. If you don’t have a mixer, a sturdy whisk will work too — it just requires a bit more elbow grease.
Baking dish or serving dish
A 9×13-inch baking dish is the standard choice for lush desserts, providing plenty of space for layering and easy slicing. You can also use a trifle dish or individual serving cups if you want to create a more elegant presentation.
Step-by-Step No-Bake Chocolate Cherry Lush Recipe
Full ingredient list
For the crust:
- 30 Oreo cookies (or chocolate wafers), finely crushed
- 6 tablespoons unsalted butter, melted
For the cream cheese layer:
- 8 oz cream cheese, softened
- 1 cup powdered sugar
- 1 teaspoon vanilla extract
- 1 container (8 oz) whipped topping (like Cool Whip)
For the chocolate pudding layer:
- 2 packages (3.9 oz each) instant chocolate pudding mix
- 3 cups cold milk
For the cherry layer:
- 1 can (21 oz) cherry pie filling (or homemade cherry filling)
For the topping:
- 1 container (8 oz) whipped topping
- Optional: chocolate shavings, extra cherries, or chopped nuts for garnish
Detailed instructions
- Prepare the crust
- Combine the crushed Oreo cookies and melted butter in a mixing bowl.
- Press the mixture firmly into the bottom of a 9×13-inch dish to form an even crust.
- Place in the refrigerator to set while you prepare the next layers.
- Make the cream cheese layer
- In a bowl, beat the softened cream cheese until smooth.
- Add powdered sugar and vanilla extract; mix until fully combined.
- Gently fold in the whipped topping until smooth and fluffy.
- Spread this layer evenly over the chilled crust.
- Prepare the pudding layer
- In another bowl, whisk together the instant chocolate pudding mix and cold milk until it thickens (about 2 minutes).
- Spread the pudding evenly over the cream cheese layer.
- Add the cherry layer
- Carefully spoon the cherry pie filling over the pudding layer, spreading it evenly without mixing into the lower layers.
- Top it off
- Spread the remaining whipped topping evenly over the cherry layer.
- Garnish with chocolate shavings, extra cherries, or nuts as desired.
- Chill and serve
- Refrigerate for at least 4 hours (or overnight) to allow the layers to set completely.
- Slice and serve chilled.
Layering tips for perfect slices
- Chill each layer for about 15 minutes before adding the next to help keep layers distinct and clean.
- Use a sharp knife dipped in hot water to make neat slices.
- Wipe the knife clean between cuts to maintain pretty layers.
Creative Variations to Try
Oreo or chocolate crust
Swap the crust to match your cravings! Use a classic Oreo crust for extra chocolatey richness, or try chocolate graham crackers for a lighter, crunchy base.
Adding nuts or chocolate chips
Mix chopped nuts (like pecans or almonds) or mini chocolate chips into the cream cheese layer for added texture and flavor. You can also sprinkle them on top for an appealing crunch.
Different fruit layers
Feeling adventurous? Substitute the cherry layer with other fruit fillings like blueberry, raspberry, or strawberry. You can even combine different berries for a mixed fruit twist that’s just as delicious and colorful.
Common Mistakes to Avoid
Overmixing cream layers
When preparing the cream cheese layer or folding in the whipped topping, it’s important not to overmix. Overmixing can deflate the whipped topping, making the layer dense instead of light and fluffy. Always fold gently until just combined to maintain an airy texture.
Using too much liquid
Adding extra milk to the pudding layer or using fruit fillings with too much juice can make the dessert runny and prevent it from setting properly. Be sure to follow the exact measurements for pudding, and if using homemade fruit filling, allow it to cool and thicken before layering.
Incorrect chilling time
One of the most common mistakes is not allowing enough chilling time. This dessert needs at least 4 hours (preferably overnight) to fully set and for the layers to firm up. Cutting into it too soon can cause messy, uneven slices and a less satisfying texture.

How to Store and Serve Chocolate Cherry Lush
Refrigeration tips
Store your Chocolate Cherry Lush covered in the refrigerator. Use plastic wrap or an airtight lid to prevent it from drying out or absorbing other fridge odors. It will stay fresh for about 3–4 days.
Make-ahead options
This dessert is a fantastic make-ahead option! You can prepare it the night before an event to save time on the day of serving. In fact, letting it chill overnight often improves the flavor and helps the layers set beautifully.
Serving presentation ideas
To make your lush dessert extra special when serving:
- Top each slice with a fresh cherry, a sprig of mint, or a drizzle of chocolate sauce.
- Serve in individual clear dessert cups or mini trifle glasses for an elegant, party-ready presentation.
- Add chocolate curls or crushed cookies on top for extra flair and texture.
Pairing Ideas for Chocolate Cherry Lush
Beverages to serve with it
Chocolate Cherry Lush is rich and indulgent, so pairing it with the right drink can elevate the experience. Consider serving it with:
- Coffee or espresso — The bitterness of coffee perfectly balances the dessert’s sweetness.
- Black tea or herbal tea — Light and refreshing, these help cleanse the palate between bites.
- Dessert wines or port — If you want to impress guests, a sweet wine like port or a cherry liqueur pairs beautifully with the chocolate and cherry flavors.
- Cold milk — A classic and comforting option that never fails with chocolate-based desserts.
Other desserts for a full spread
If you’re putting together a dessert table, pair your lush with treats that offer different textures and flavors, such as:
- Lemon bars or key lime pie for a citrusy contrast.
- Fresh fruit platters to add a refreshing, light option.
- Mini cheesecakes or mousse cups to keep the creamy theme going while offering variety.
Customizing for Special Diets
Gluten-free crust alternatives
For a gluten-free version, swap out the Oreo or wafer crust for gluten-free cookies or gluten-free graham crackers. Simply crush them and mix with melted butter as you would with a traditional crust.
Dairy-free or vegan options
To make this dessert dairy-free or vegan:
- Use dairy-free cream cheese and dairy-free whipped topping (such as coconut-based options).
- Choose a vegan pudding mix and make it with a plant-based milk like almond or oat milk. Check the package instructions as some non-dairy milks may affect pudding consistency.
- Opt for a vegan cookie for the crust and use vegan butter or coconut oil as a binder.
These swaps allow everyone to enjoy this dessert without sacrificing its creamy, luscious texture.
Frequently Asked Questions About No-Bake Chocolate Cherry Lush
Can I make it ahead?
Absolutely! In fact, making it ahead is recommended. Preparing it a day in advance allows the layers to fully set, making it easier to cut clean slices and intensifying the flavors.
How long does it last?
When stored properly in the refrigerator (covered with plastic wrap or an airtight lid), Chocolate Cherry Lush will stay fresh for about 3 to 4 days. After that, the texture may start to soften too much, and the crust may become soggy.
Can I freeze it?
While you can freeze Chocolate Cherry Lush, it’s not always ideal. Freezing may affect the creamy texture and cause the layers to separate slightly upon thawing. If you do choose to freeze it, wrap it tightly and store it for up to one month. Thaw overnight in the refrigerator before serving, and be aware the consistency might be softer than freshly made.
While enjoying the creamy, fruity layers of this No-Bake Chocolate Cherry Lush, readers who love easy, no-bake treats might also be interested in trying Peanut Butter No-Bake Cookies or Chocolate Peanut Butter No-Bake Cookies, both of which offer quick, satisfying options without turning on the oven. For those craving even more chocolate, the Double Chocolate Chip Cookies or the fudgy Easy Saucepan Brownies make perfect pairings on a dessert table. Additionally, if you’re planning a full dessert spread, consider complementing this lush with the delightful Ice Cream Cake or a classic Lemon Pound Cake to add refreshing variety.
For more inspiration and helpful tips on creating no-bake treats, check out these no-bake dessert ideas from Taste of Home.
Conclusion: Indulge in Layers of Chocolate and Cherry Bliss
This No-Bake Chocolate Cherry Lush is more than just a dessert — it’s a celebration of rich, creamy chocolate and bright, juicy cherries, all layered together in one irresistible bite. With its no-fuss preparation and show-stopping presentation, it’s the perfect treat to share at summer parties, holiday gatherings, or whenever you need a sweet escape.
Don’t hesitate to get creative with variations and make it your own. Whether you keep it classic or add your personal twist, this lush dessert is guaranteed to delight anyone who tries it. So gather your ingredients, layer up the goodness, and enjoy a blissful, no-bake masterpiece worth sharing with friends and family!


